
Functions and calibration accuracy of Lignomats moisture meters can be confirmed in a few easy steps.
Calibrations are pre-programmed in the moisture meters. They do not change thanks to micro-processor technology. In addition, calibrations in Lignomat’s moisture meters are internally checked every time before a moisture reading is displayed. If the calibration needs to be confirmed, we offer external calibration check blocks for pin and pinless meters, as described below.
Function of the meter. If a moisture meter works correctly depends not only on correct and dependable calibrations but also on the flawless function of the entire measuring circuitry including all connections from pins or measuring pads to the display. That means, even if the calibrations are checked internally, the moisture meter could still be malfunctioning.

Pin meter Test Block can be used for meters with built-in pins. Moisture values are checked for 12% and 20% within +/-1%.
Following are steps to check functions and calibration accuracy of your pin and pinless moisture meters from Lignomat:
Pin Moisture Meters:
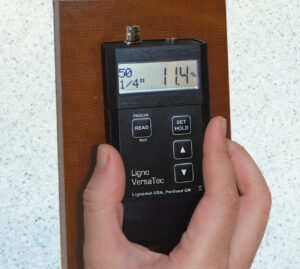
Step 1: Open circuit check. Select setting # 3 (103) and a wood temperature of 70°F (all pin meters are calibrated for 70°F). First check the meter only. Turn the meter on, do not touch the pins and a low moisture value should be indicated ( For Ligno meters PIN/Min appears on the left side of the display). Next connect the cable. Turn the meter on again do not touch the open cable end and the same value should be indicated. Last check the
meter with cable and electrode (do not touch the electrode pins).
Your equipment passed the open circuit check, if the minimum value is indicated every time:
– failed first check, the meter is defective
– failed second check, the cable is defective
– failed third check, the electrode is defective.
The test confirms whether or not there is a short in the measuring system.
Step 2: Closed circuit check. Connect meter, cable and electrode. When the meter is turned on and the metal tips of both pins are touched with two fingers, a reading higher than at least 12% should be indicated. If that is not the case, disconnect the electrode (electrode may be defective). To check the cable, put your thumb on the open cable end. The cable is ok, if a reading higher than 12%
is indicated. If the cable is defective, it cannot be determined if the electrode is also defective.
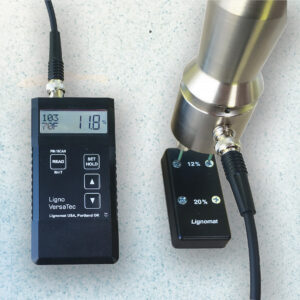
Pin meter Test Block used for meters, cable and hand probe. Moisture values are checked for 12 and 20% within +/= 1%
Step 3: Lignomat offers an external calibration check block TP. The block is used to verify the calibration of all Lignomat pin meters. Connect meter, cable and electrode. Select setting # 3 (103) and a wood temperature of 70°F. Place pins on screws for a value of 12% and 20%. Test confirms that meter, electrode and cable are functioning and calibrated correctly. If you want to validate your moisture meter’s calibration or have to prove in court, that your moisture meter was calibrated correctly, you need the external test block. A photo can easily prove, that the moisture meter’s calibration has been checked. The test with the external test block replaces the closed circuit check described in step 2, it does not replace the open circuit check described in step 1. We recommend to perform step 1 always to show that the meter can measure moisture values below 12%: Assume your hand probe is dirty from dust and humidity, this could cause the meter to be unable to read low moisture values.
Pinless Moisture Meter
The function and calibration accuracy of Lignomat’s pinless moisture meter is confirmed with a test block from Lignomat. An actual measurement is taken, and the indicated value is compared to the expected value given for the test block. We use a material block, which produces an expected reading. The same block can be used for all pinless moisture meters from Lignomat and for both 3/4″ and 1/4″ measuring depth.
Step 1: Open circuit check. Set the meter to pinless mode, choose setting # 50. Hold the meter in the air to make sure no material is touching the measuring plates. When the READ key is pressed, a low moisture value of 5.4% should be indicated with SCAN/Min to the left side of
the display. For 1/4” and the 3/4” depth the same value should appear.
Pinless Test Block consists of a material block. The expected value is listed on the back of each check block.
Step 2: Closed circuit check. Place the pinless meter on your forearm and press the READ key. A high moisture value should be indicated. An additional meter check can be performed by measuring a ream of paper. If the paper test is done repeatedly with the same setting, the indicated value should not vary significantly over time. This can be used to check consistency / accuracy of the pinless calibration.
Step 3: Lignomat offers an external calibration check block TS for all Lignomat pinless meters. The check block for pinless meters from Lignomat is a material plate which produces a defined reading, when the meter is lightly pressed against its surface on setting #50. Every time you check, the indicated value should be within +/- 1% of the test value given for the test block. Each test block lists its own value. However, all Lignomat pinless meters can be checked with the same check block, and all meters should show the same value (+/- 1%) indicated on the back of the test block.
For pin and pinless meters:
If step 1, 2 or 3 fail either the battery needs to be replaced or the meter
is defective. Call customer service 800-227-2105
→ Click for more info on Pin Moisture Meter Test Block
→ Click for more info on Pinless Moisture Meter Test Block